Thoughts on Vulkan

As I write this (February 17), we’re two days removed from the initial release of the Vulkan API. A lot has been written across the Internet about what this means for games, gamers, and game developers, so I thought I’d add my two cents.

I’ve been watching the progress of Vulkan with interest as both user and programmer, and on a “minority” platform (Linux). For both reasons, Vulkan should be making me ecstatic, but it really isn’t. I’m not trying to be the wet blanket here, but everything I see about Vulkan is written in such a gushing tone that I feel the need to provide a counterweight.

What is it?

First off, the rundown. Vulkan is basically the “next generation” of OpenGL. OpenGL, of course, is the 3D technology that powers everything that isn’t Windows, as well as quite a few games on Windows. Vulkan is intended to be a lower-level—and thus faster—API that achieves its speed by being closer to the metal. It’s supposed to be a better fit for the actual hardware of a GPU, rather than the higher-level state machine of OpenGL. Oh, and it’s cross-platform, unlike DirectX.

As of 2/17, there’s only one game out there that can use Vulkan: The Talos Principle. Drivers are similarly scarce. AMD’s are alpha-quality on Windows and nonexistent on Linux, nVidia only has an old beta for Linux, but much better Windows support, and Intel is, well, Intel. Hurray for competition.

Why it’s good

The general rule in programming is that the higher in the “stack” you go, the slower you get. High-level languages like JavaScript, Python, and Ruby are all dreadfully slow when compared to the lower-level C and C++. And assembly is the fastest you can get, because it’s the closest thing to a native language. For GPUs, the same thing is true. OpenGL is fairly high up in the stack, and it shows.

Vulkan was made to fit in a lower level. It has better support for multithreading, multicore programming. Shaders are faster. Everything about it was made to speed things up while remaining stable and supported. In essence, the purpose is to put everyone on a level playing field everywhere except the GPU. To make the OS irrelevant to graphics.

That’s a good thing. I say that not only because I use Linux, not only because I’d like more games for it. I say that as someone who loves the idea of computers in general and as gaming machines. Anything that makes things better while keeping the PC open is a win for everybody. DirectX might be the best API ever invented (I’ve heard people say it is), but if you’re using something other than Windows or an Xbox, it might as well not exist. OpenGL works just about everywhere there’s graphics. If Vulkan can do the same, then there’s no question that it’s good.

Why it’s not

But it won’t. That’s the problem. Vulkan ultimately derives from AMD’s Mantle API, which was mostly made for the Xbox One and PS4, to give them a much-needed power boost. The PC wasn’t exactly an afterthought, but it doesn’t seem like it was ever going to be the main focus of Mantle. Now, that console-oriented nature probably got washed away in the transition to Vulkan, but it causes a ripple effect, meaning that…

Vulkan doesn’t work everywhere.

Yeah, I said it. Currently, it requires some serious hardware support, and it’s mostly limited to the latest couple of generations of GPU. Intel only makes integrated graphics, and some of those can use it, but you know how that goes. For the GTX line, you need at least a 6-series, and then only the best of them. AMD has the widest support, as you’d expect, but it’s full of holes. On Linux, the R9 290 won’t be able to use Vulkan, because it uses the wrong driver (radeonsi instead of amdgpu).

And that brings me to my problem. For AMD’s APU integrated graphics, you have to have at least the Kaveri chipset, because that’s when they started putting in the GCN stuff that Vulkan requires. Kaveri came out in early 2014, a mere two years ago. It was supposed to release in late 2013, but delays crept in. Since I built my current PC for Christmas 2013, I’m out of luck, unless I want to buy a new video card.

But there’s no good choice for that right now, not on Linux. Do I get something from nVidia, where I’m stuck with proprietary drivers, and I can’t even upgrade the kernel without worrying that they’ll crash? Or do I buy AMD, the same company that got me into this mess in the first place? Sure, they have better open-source drivers, but who’s to say that they’ll actually work? You can ask the 290 owners what they think about that one.

The churn

So, for now, I’m on the outside looking in when it comes to Vulkan. But I can see the benefit in that. I get to watch while all the early adopters work out the kinks.

Vulkan isn’t going to take over the world in a night, or a month, or even a year. There are just too many people out there with computers that can’t use it. It’ll take some time before that critical mass is reached, when there are enough Vulkan-capable PCs out there to make it worthwhile to dump OpenGL. (DirectX isn’t really a factor here. It’s tied to Windows, and to a specific Windows version. I don’t care if DX12 is the Second Coming, it’s not going to make me get Windows 10.)

Game engines can start supporting Vulkan right now. Quite a few of them are, like Valve’s Source Engine. As an alternate code path, as an optimization used if possible, it’s fine. As a replacement for the OpenGL rendering system of an engine? Not a chance. Not yet.

Give it some time. Give the Khronos Group a couple of versions to fix the inevitable bugs. Give the world a few years to cycle through their current—underpowered or unsupported—computers or GPUs. When we get to that point, you might be able to see Vulkan reach its full potential. 2020 is a nice year, I think. It’s four years into the future, so that’s a couple of generations of graphics cards and about one upgrade cycle for most people and time for a new set of consoles. If Vulkan hasn’t taken off by then, it probably never will. But it will, eventually.
Transparent terrain with Tiled

Tiled is a great application for game developers. One of its niftiest features is the Terrain tool, which makes it pretty easy to draw a tilemap that looks good with minimal effort.

Unfortunately, the Terrain tool does have its limitations. One of those is a big one: it doesn’t work across layers. Layers are essential for any drawing but the simplest MS Paint sketches, and it’s a shame that such a valuable development tool can’t use them to their fullest potential.

Well, here’s a quick and dirty way to work around that inability in a specific case that I ran into recently.

The problem

A lot of the “indie” tile sets out there use transparency (or a color key, which has the same effect) to make nice-looking borders. The one I’m using here, Kenney’s excellent Roguelike/RPG pack, is one such set.

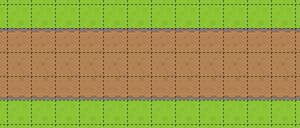
The problem comes when you want to use it in Tiled. Because of the transparency, you get an effect like this:

Transparent terrain

Normally, you’d just use layers to work around this, maybe by making separate “grass” and “road” layers. If you’re using the Terrain tool, though, you can’t do this. The tool relies on “transitions” between tile types. Drawing on a new layer means you’re starting with a blank slate. And that means no transitions.

The solution

The solution is simple, and it’s pretty much what you’d expect. In a normal tilemap, you might have the following layers (from the bottom up):

  1. The bare ground (grass, sand, water, whatever),
  2. Roads, paths, and other terrain modifications,
  3. Buildings, trees, and other placeable objects.

My solution to the Terrain tool’s limitation is to draw all the “terrain” effects on a single layer. Below that layer would be a “base”, which only contains the ground tiles needed to fill in the gaps. So our list would look more like this:

  1. Base (only needs to be filled in under tiles with transparency),
  2. Terrain, including roads and other mods,
  3. Placeable objects, as before.

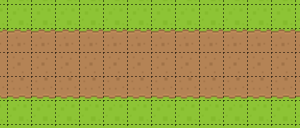
For our road on grassland above, we can use the Terrain tool just as described in the official tutorial. After we’re done, we can create a new layer underneath that one. On it, we would draw the base grass tiles where we have the transparent gaps on our road. (Of course, we can just bucket fill the whole thing, too. That’s quicker, but this way is more flexible.) The end result? Something like this:

Filling in the gaps

It’s a little more work, but it ends up being worth it. And you were going to have to do it anyway.

Fractal rivers with Inkscape

I’m not good with graphics. I’m awful at drawing. Maps, however, are one of the many areas where a non-artist like myself can make up for a lack of skill by using computers. Inkscape is one of those tools that can really help with map-making (along with about a thousand other graphical tasks). It’s free, it works on just about any computer you can imagine, and it’s very much becoming a standard for vector graphics for the 99% of people that can’t afford Adobe products or an art team.

For a map of a nation or world, rivers are an important yet difficult part of the construction process. They weave, meander, and never follow a straight line. They’re annoying, to put it mildly. But Inkscape has a tool that can give us decent-looking rivers with only a small amount of effort. To use it, we must harness the power of fractals.

Fractals in nature

Fractals, as you may know (and if you don’t, a quick search should net you more information than you ever wanted to know), are a mathematical construct, but they’re also incredibly good at modeling nature. Trees follow a fractal pattern, as do coastlines. Rivers aren’t exactly fractal, but they can look like it from a great enough distance, with their networks of tributaries.

The key idea is self-similarity; basically, a fractal is an object that looks pretty much the same no matter how much you zoom in. Trees have large branches, and those have smaller branches, and then those have the little twigs that sometimes branch themselves. Rivers are fed by smaller rivers, which are fed by streams and creeks and springs. The only difference is the scale.

Inkscape fractals

Inkscape’s fractals are a lot simpler than most mathematical versions. The built-in extension, from what I can tell, uses an algorithm called midpoint displacement. Roughly speaking, it does the following:

  • Find the midpoint of a line segment,
  • Move that point in a direction perpendicular to the line segment by a random amount,
  • Create two new segments that run from either endpoint to the new, displaced midpoint,
  • Start over with each of the new line segments.

The algorithm subdivides the segment a number of times. Each new stage has segments that are half the length of the old ones, meaning that, after n subdivisions, you end up with 2^n^ segments. How much the midpoint can be moved is another parameter, called smoothness. The higher the smoothness, the less the algorithm can move the midpoint, resulting in a smoother subdivision. (In most implementations of this algorithm, the amount of displacement is scaled, so each further stage can move a smaller absolute distance, though still the same relative to the size of the segment.)

The method

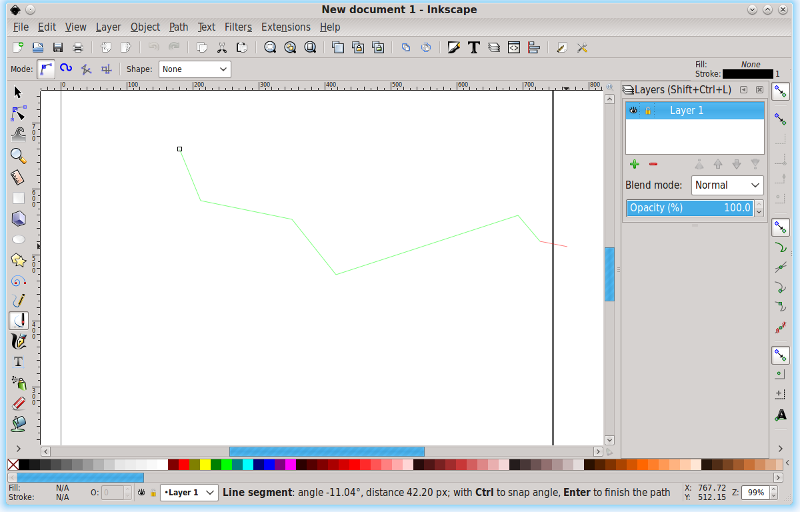
  1. First things first, we need to start drawing an outline of the shape of our river. It doesn’t have to be perfect. Besides, this sketch is going to be completely modified. Here, you can see what I’ve started; this was all done with the Line tool (Shift+F6):

    Designing the path

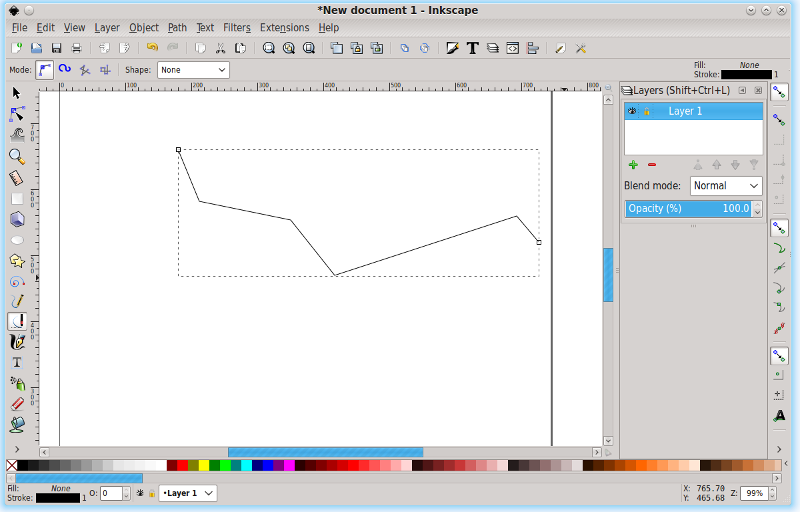
  2. Once you’ve got a rough outline, press Enter to end the path:

    Finishing the outline

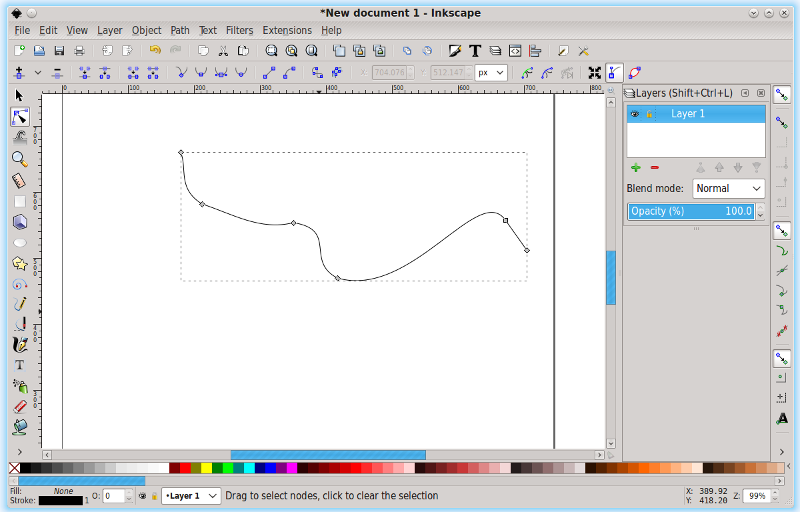
  3. If you want to have curved segments, that’s okay, too. The fractal extension works just fine with them. Here, I’ve dragged some nodes and handles around using the path editor (F2):

    Adding some curves

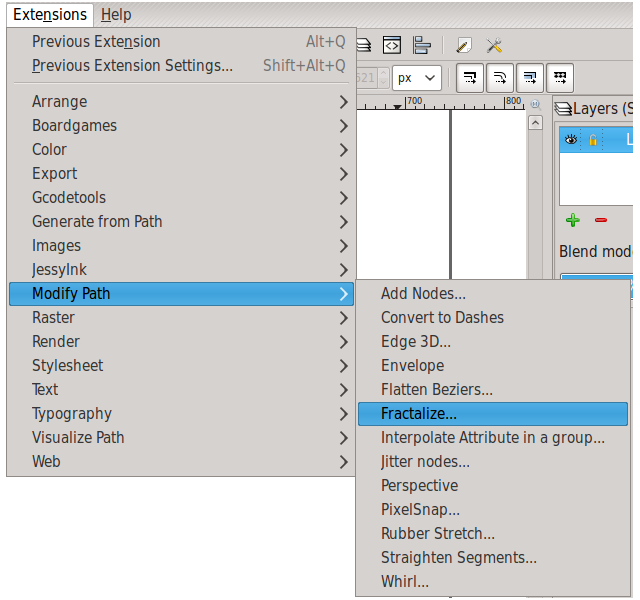
  4. Now it’s time to really shake things up. Make sure your path is selected, and go to Extensions -> Modify Path -> Fractalize:

    Fractalize in the menus

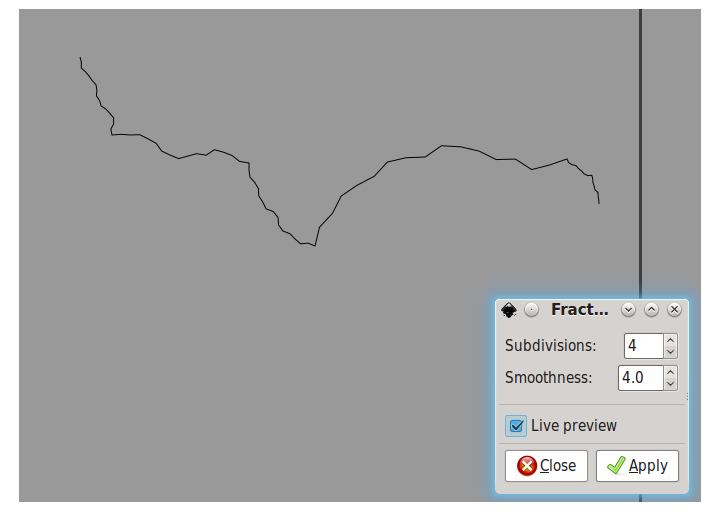
  5. This displays a dialog box with two text inputs and a checkbox. This is the interface to the Fractalize extension. You have the option of changing the number of subdivisions (more subdivisions gives a more detailed path, at the expense of more memory) and the smoothness (as above, a higher smoothness means that each displacement has less room to maneuver, which makes the final result look smoother). “Live preview” shows you the result of the Fractalize algorithm before you commit to it, changing it as you change the parameters. Unless your computer seems to be struggling, there’s no reason not to have it on.

    The Fractalize extension

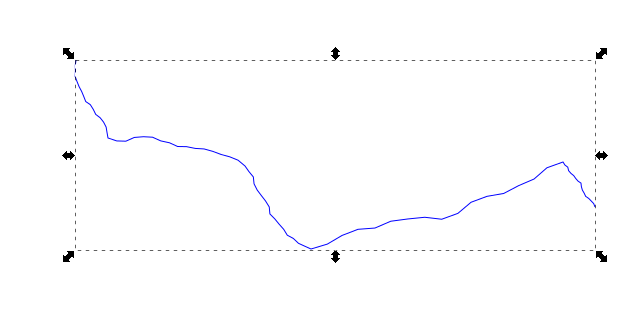
  6. When you’re happy with the settings, click Apply. Your outlined path will now be replaced by the fractalized result. I set mine to be blue. (Shift+click on the color swatch to set the stroke color.)

    The finished product

And that’s all there is to it! Now, you can go on from here if you like. A proper, natural river is a system, so you’ll want to add the smaller rivers that feed into this one. Inkscape has the option to snap to nodes, which lets you start a path from any point in your river. Since Fractalize keeps the endpoints the same, you can build your river outwards as much as you need.