Movement on a grid is common in many games, especially 2D games. In one of my current projects (a “falling blocks” game), this particular problem came up: how do you get grid-based (or discrete) movement on the X-axis while retaining free, continuous movement on the Y-axis? Specifically, I’m using the Godot engine, but the same principle should carry over to any game engine or development environment.
Movement in 2D
Many 2D game engines offer physics systems, and they all tend to be pretty similar (probably because most of them use Box2D under the hood). While your game may be all about sprites, the physics code works with bodies and shapes. Roughly speaking, bodies represent the “mass” of your game objects, while a body’s shapes outline its area. When two bodies’ shapes overlap, there’s a collision, which is handled however your game is supposed to: kill an enemy, take damage from a bullet, etc.
Depending on the specific engine, you have a few different kinds of shapes available. Godot, for example, lets you assign rectangles, circles, lines, “capsules” (like a rectangle with rounded caps on each end), and general polygons. If these aren’t enough, you can combine multiple shapes on a single body. Of course, most 2D engines work this way, so you probably already knew all that.
For bodies, you again have options. Walls and other immobile obstacles are usually static bodies (i.e., they don’t move), and interactive elements are often rigid bodies fully under the influence of physics. The player character, in many engines, is a third type of body, the kinematic body, which causes collisions and stops when it hits a static body, but isn’t affected by forces or friction or, indeed, any physics at all. Once again, though, you already know all of this, because that’s how most 2D physics engines work.
The Setup
For this specific problem, I’m using a kinematic body to represent each falling block. Attached to that body is a sprite (the default Godot icon, for this post) and a collision shape, as you can see in this screenshot:

(In Godot, there are separate classes for 2D and 3D physics objects, so we have to use KinematicBody2D and CollisionShape2D.)
The kinematic body is the basic object representing each block, the sprite is its appearance, and the collision shape defines its area. Simple enough. Now, what we want to happen is this: move the sprite in two different ways. On the Y-axis, the block should fall down continuously, moving through every point on its way to the bottom. On the X-axis, however, we want the block to “jump” from one position to another, because the blocks have to stack perfectly.
I’ve also set up a scene to use as a base. It’s nothing much, just walls on either side and a floor on the bottom of the screen:
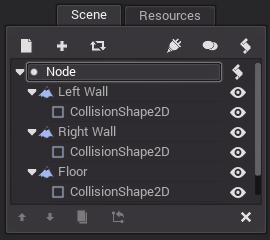
When all this is done, we’ll have a sprite falling from the top of the screen until it hits the “wall” at the bottom. At any point after it appears, you can click and drag it to move it from side to side, and it will stay on a grid, something like this:
Making the Body
We can make the body/sprite/shape combination as follows:
- The
KinematicBody2Dis the root node. The only property I changed was reducing the collision margin (Collision > Margin in the Inspector window) to 0.001, the lowest it can go. You don’t actually need to do this for the example, but it may help if you have a problem with collisions detected when bodies aren’t really touching. (There’s also a script attached to this node, but we’ll get to that.) - The
Spriteis our image. Load theicon.pngfile that’s included with every Godot project, and you can leave pretty much everything else as is. - The
CollisionShape2Dnode, as you might expect, is our collision shape. Due to the way Godot works, we need to define the shape of the shape, which you can do under CollisionShape2D > Shape in the Inspector. Create a newRectangleShape2Din the menu, and set its X and Y extents to something a little less than 32:
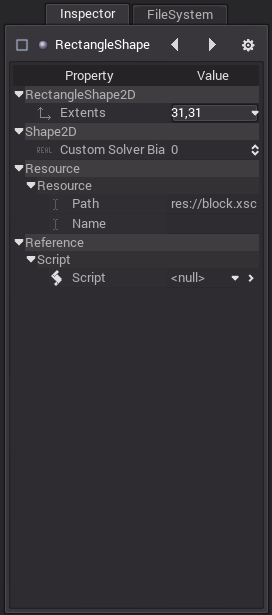
(The logo image is 64×64 pixels in size, and extents are measured from the center. If we set the extents to exactly 32, then some blocks might be considered colliding when they really aren’t. That’s because of the collision margin I mentioned above. You can even like 31.999 if you like, and that may work better than 31. Honestly, I’m not sure at the moment.)
The Code
Now that we have all that out of the way, we come to the real meat of the post, the code. Add a new script to your KinematicBody2D node. I named mine gridmove.gd, but you can call it whatever you want. Anyway, here’s the code:
extends KinematicBody2D

# Our accumulated motion on the X axis
var xaccum

# Track if we're dragging a sprite
var mouse_down

# These are the width and height of the sprite
var twidth
var theight

# A default fall speed (like gravity, but velocity instead of acceleration)
const STARTING_SPEED = 100.0

# A velocity vector that we'll use for calculations below
var velocity = Vector2()

func _ready():
    # This object will use input and fixed-timestep physics
    set_process_input(true)
    set_fixed_process(true)

    # Initialize our variables
    xaccum = 0
    twidth = get_node("Sprite").get_texture().get_width()
    theight = get_node("Sprite").get_texture().get_height()
    mouse_down = false
    velocity.y = STARTING_SPEED

func _fixed_process(delta):
    # The object will fall until it hits the bottom of the world or another object
    var motion = velocity * delta

    # Test if we've accumulated enough movement to "jump" one grid square,
    # If we have, then we'll add that much movement to our motion vector.
    if abs(xaccum) > twidth:
        motion.x = twidth * sign(xaccum)
        xaccum -= twidth * sign(xaccum)
    else:
        motion.x = 0

    # Move the object as much as possible
    motion = move(motion)

    # If we're colliding (with the wall or another object),
    # then we need to modify our motion vector.
    # See the Godot wiki for how and why this works:
    # https://github.com/okamstudio/godot/wiki/tutorial_kinematic_char#problem
    if is_colliding():
        var n = get_collision_normal()
        motion = n.slide(motion)
        move(motion)

    # If the mouse button has been released,
    # we can stop worrying about motion on the X axis
    if not mouse_down:
        xaccum = 0

func _input(event):
    # Create a rectangle covering the entire sprite area
    var gp = get_global_pos()
    gp.x -= twidth/2
    gp.y -= theight/2
    var gr = Rect2(gp, Vector2(twidth, theight))

    # If the left mouse button is pressed while over the object,
    # all we do is set our state variable. If it's released anywhere,
    # we clear that same variable.
    if event.type == InputEvent.MOUSE_BUTTON and event.button_index == 1:
        if gr.has_point(event.pos):
            mouse_down = event.pressed
            get_tree().set_input_as_handled()
        elif mouse_down and not event.pressed:
            mouse_down = false

    # If the user drags while holding the left mouse button,
    # that's our signal to start accumulating motion.
    if event.type == InputEvent.MOUSE_MOTION and mouse_down:
            xaccum += event.relative_x
            get_tree().set_input_as_handled()
The comments tell you most of what’s going on in the code itself. Basically, what we’re doing is “saving up” the motion on the X-axis until it’s enough to move by one grid “square”, which is the width of the logo sprite. The xaccum variable holds how much motion we’ve saved, and we check it each frame (technically, each physics update period, which isn’t necessarily tied to the frame rate). If we’ve saved up enough, then we move the sprite, deducting that motion from our accumulated value.
The added wrinkle is due to gravity, as you can see at the top of the _fixed_process function. Blocks in this particular scene fall at 100 pixels per second, and then they might move on the X-axis. With a vector, we can represent both of these motions, as in line 44, but then we have a problem. Kinematic bodies, remember, can cause collisions when they move, and the move() method stops when the body collides with another, as explained in the wiki article linked on line 49, which also shows how to use the slide() method to change the motion vector.
Spawning the Blocks
The following script should be added to the root Node of the other scene (the one where we defined the walls and floor). All it does is spawn a new block (body, sprite, and shape) whenever you press Space.
extends Node

var block

func _ready():
    set_process_input(true)
    randomize()
    block = load("res://block.xscn")
    spawn(randi() % 10)

func _input(event):
    if event.type == InputEvent.KEY and event.is_pressed() and event.scancode == KEY_SPACE:
        spawn(randi() % 10)

func spawn(column):
    var node = block.instance()
    var tex = node.get_node("Sprite").get_texture()

    # Add 1 to the column value for the left wall,
    # add 0.5 because positions are relative to the center of an object
    var spawn_x = (column + 1.5) * tex.get_width()
    node.set_pos(Vector2(spawn_x, tex.get_height() / 2))
    add_child(node)
Most of this is basic Godot engine stuff like creating a node instance. We do add a hint of uncertainty by spawning each new block in a random grid column.
Conclusion
There’s a lot more that can be done with this code, and it’s probably not bug-free. There may even be a better way of going about this particular problem. If so, I’d love to hear about it! Also, even though I used Godot for this example, the same pattern will work anywhere you have 2D physics, from big names like Unity, to Phaser and other “simpler” engines. You might even be able to adapt it to work in 3D, but I haven’t really tried. Let me know what you come up with, and have fun!