Tiled is a great application for game developers. One of its niftiest features is the Terrain tool, which makes it pretty easy to draw a tilemap that looks good with minimal effort.
Unfortunately, the Terrain tool does have its limitations. One of those is a big one: it doesn’t work across layers. Layers are essential for any drawing but the simplest MS Paint sketches, and it’s a shame that such a valuable development tool can’t use them to their fullest potential.
Well, here’s a quick and dirty way to work around that inability in a specific case that I ran into recently.
The problem
A lot of the “indie” tile sets out there use transparency (or a color key, which has the same effect) to make nice-looking borders. The one I’m using here, Kenney’s excellent Roguelike/RPG pack, is one such set.
The problem comes when you want to use it in Tiled. Because of the transparency, you get an effect like this:
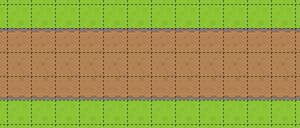
Normally, you’d just use layers to work around this, maybe by making separate “grass” and “road” layers. If you’re using the Terrain tool, though, you can’t do this. The tool relies on “transitions” between tile types. Drawing on a new layer means you’re starting with a blank slate. And that means no transitions.
The solution
The solution is simple, and it’s pretty much what you’d expect. In a normal tilemap, you might have the following layers (from the bottom up):
- The bare ground (grass, sand, water, whatever),
- Roads, paths, and other terrain modifications,
- Buildings, trees, and other placeable objects.
My solution to the Terrain tool’s limitation is to draw all the “terrain” effects on a single layer. Below that layer would be a “base”, which only contains the ground tiles needed to fill in the gaps. So our list would look more like this:
- Base (only needs to be filled in under tiles with transparency),
- Terrain, including roads and other mods,
- Placeable objects, as before.
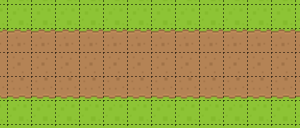
For our road on grassland above, we can use the Terrain tool just as described in the official tutorial. After we’re done, we can create a new layer underneath that one. On it, we would draw the base grass tiles where we have the transparent gaps on our road. (Of course, we can just bucket fill the whole thing, too. That’s quicker, but this way is more flexible.) The end result? Something like this:
It’s a little more work, but it ends up being worth it. And you were going to have to do it anyway.
